



Installing a rotating stage can seem like a daunting task, but with the right guidance and preparation, it can be a manageable project. As a rotating stage supplier, I've had the opportunity to assist numerous clients in the installation process, and I'm excited to share my insights with you. In this blog post, I'll walk you through the steps of installing a rotating stage, from planning and preparation to the actual installation and testing.
Planning and Preparation
Before you begin the installation process, it's crucial to plan and prepare thoroughly. This will help ensure that the installation goes smoothly and that the rotating stage functions correctly. Here are the key steps to take during the planning and preparation phase:
1. Determine the Location
The first step is to choose the right location for your rotating stage. Consider the following factors when selecting a location:
- Space: Ensure that the area where you plan to install the rotating stage is large enough to accommodate the stage and any additional equipment or props.
- Accessibility: The location should be easily accessible for both installation and maintenance.
- Floor Condition: The floor must be level, strong, and able to support the weight of the rotating stage and its load. If the floor is uneven or weak, you may need to reinforce it before installation.
- Power Supply: Make sure there is a nearby power source that can provide the necessary electricity for the rotating stage.
2. Measure the Space
Once you've chosen the location, measure the space carefully to ensure that the rotating stage will fit properly. Take into account the dimensions of the stage, including its diameter, height, and clearance requirements. You may also need to consider the space needed for any additional equipment, such as motors, controllers, or safety barriers.
3. Select the Right Rotating Stage
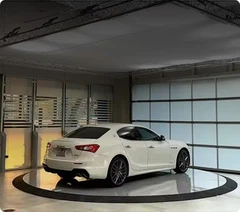
Based on your measurements and requirements, select the appropriate rotating stage for your project. Consider factors such as the load capacity, rotation speed, and control options. As a rotating stage supplier, I can help you choose the right stage for your specific needs. You can check out our DAXLIFTER Customized Car Vehicle Rotary Rotating Stage Platform for a high-quality and customizable option.
4. Gather the Necessary Tools and Materials
Before you start the installation, gather all the tools and materials you'll need. This may include wrenches, screwdrivers, drills, measuring tapes, and safety equipment such as gloves and goggles. Make sure you have all the parts and components of the rotating stage, as well as any additional hardware or accessories.
5. Review the Installation Manual
Carefully review the installation manual provided by the rotating stage manufacturer. The manual will provide detailed instructions on how to install the stage, including step-by-step diagrams and safety precautions. Make sure you understand all the instructions before you begin the installation.
Installation Process
Once you've completed the planning and preparation phase, it's time to start the installation process. Here are the general steps involved in installing a rotating stage:
1. Prepare the Floor
If the floor needs to be reinforced or leveled, do this before installing the rotating stage. This may involve pouring a concrete pad, installing steel beams, or using leveling compounds. Make sure the floor is clean and free of debris before proceeding.
2. Assemble the Rotating Stage
Follow the manufacturer's instructions to assemble the rotating stage. This may involve attaching the base, mounting the motor and controller, and connecting the electrical wiring. Make sure all the parts are securely fastened and that the wiring is properly connected.
3. Install the Rotating Stage
Carefully lift the assembled rotating stage into place and position it on the prepared floor. Use a level to ensure that the stage is perfectly horizontal. Secure the stage to the floor using the provided mounting hardware.
4. Connect the Power Supply
Connect the rotating stage to the power source using the appropriate electrical cables. Make sure the power supply is turned off before making any connections. Follow the manufacturer's instructions to ensure that the wiring is correct and that the stage is properly grounded.
5. Install the Control System
Install the control system for the rotating stage, which may include a control panel, remote control, or computer interface. Follow the manufacturer's instructions to connect the control system to the stage and program it according to your requirements.
6. Test the Rotating Stage
Once the installation is complete, test the rotating stage to ensure that it is functioning properly. Turn on the power supply and use the control system to start the rotation. Check the rotation speed, direction, and stability of the stage. Make any necessary adjustments to the control settings or the stage components.
Safety Considerations
Installing a rotating stage involves working with heavy equipment and electrical systems, so it's important to prioritize safety at all times. Here are some safety considerations to keep in mind:
- Read and Follow the Instructions: Always read and follow the installation manual and safety instructions provided by the manufacturer.
- Use Proper Safety Equipment: Wear appropriate safety equipment, such as gloves, goggles, and hard hats, when working with the rotating stage.
- Turn Off the Power: Before making any electrical connections or performing maintenance on the stage, turn off the power supply to avoid the risk of electric shock.
- Secure the Stage: Make sure the rotating stage is securely fastened to the floor to prevent it from tipping over or moving during operation.
- Keep Clear of Moving Parts: Avoid getting too close to the moving parts of the rotating stage, such as the motor, gears, and belts, to prevent injury.
Maintenance and Troubleshooting
To ensure the long-term performance and reliability of your rotating stage, it's important to perform regular maintenance and troubleshooting. Here are some tips for maintaining and troubleshooting your rotating stage:


- Regular Cleaning: Keep the rotating stage clean and free of debris to prevent damage to the components.
- Lubrication: Follow the manufacturer's recommendations for lubricating the moving parts of the stage to reduce friction and wear.
- Inspection: Regularly inspect the rotating stage for any signs of damage or wear, such as loose bolts, worn belts, or electrical problems.
- Troubleshooting: If you encounter any problems with the rotating stage, refer to the troubleshooting section of the installation manual or contact the manufacturer for assistance.
Conclusion
Installing a rotating stage can be a complex project, but with the right planning, preparation, and installation process, it can be a rewarding experience. As a rotating stage supplier, I'm here to help you every step of the way. Whether you need assistance in choosing the right stage, installing it correctly, or maintaining it over time, I'm just a call away.
If you're interested in purchasing a rotating stage or have any questions about the installation process, please don't hesitate to contact us. We offer a wide range of high-quality rotating stages, including the DAXLIFTER Customized Car Vehicle Rotary Rotating Stage Platform and the Floor To Floor Car Lift Platform. Our team of experts will be happy to assist you in finding the perfect solution for your needs.
References
- Manufacturer's installation manual for the rotating stage
- Safety guidelines for working with heavy equipment and electrical systems